


Table of contents
Introduction
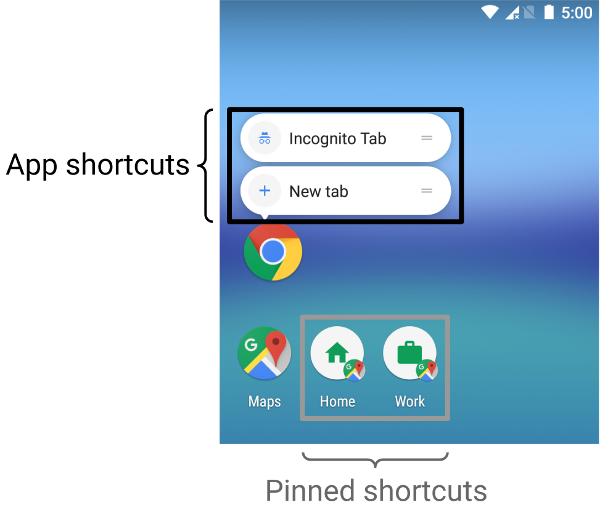
There are three types of shortcuts in Android that can be implemented in Flutter: static, dynamic, and pinned. You can read more about these shortcuts in the Android documentation by clicking here.
In this article, we are going to create pinned shortcuts in Flutter. We will see this example for the use case where we'll launch a different screen if clicked on the pinned shortcut instead of the home screen, which opens by default in the app.
As there is no direct provision for creating pinned shortcuts in Flutter, we are going to use native bridge (platform channels) between Flutter and Android Native to establish two-way communication. I'll not be going in depth on the creation of platform channels for data transfer, but you can see the full approach with code in my previous article here.
Note that I'll be using Kotlin as my native Android language.
Approach
Establish a native bridge between Flutter and Android.
Send an identifier from Flutter to Android.
Create a pinned shortcut using the previous identifier.
Send a call back to Flutter if the pinned shortcut is clicked.
Inflate a screen using that callback in Flutter.
Steps in detail
Step 0: Project starting point
Before creating any pinned shortcuts, we will essentially create a starting point. Click here for the initial code I will be using. Don't worry if you do not want to fork the repository; its lib folder only has the files main.dart and home.dart.
The main.dart file contains the basic structure of the MaterialApp.
The home.dart files contain the HomeScreen widget, which has a button whose onTap takes users to an AnotherScreen widget with plain text; onLongPress is currently an empty function.
Step 1 & 2: Create platform channels and send an identifier
To determine which screen to open, we will transfer a string using a native bridge that connects Flutter and Android. You can use any type of identifier, such as a string, integer, or bool, based on your use case. Although we only have one screen at the moment, sending distinct identifiers when making distinct pinned shortcuts is crucial to determining what action should happen when a given shortcut is clicked.
We'll be manipulating MainActivity.kt and home.dart files in order to do this.
In MainActivity.kt, we'll write a method channel to receive the information that is passed from Flutter. It is done by overriding the configureFlutterEngine function to receive the data and creating a function to actually use that data to create a pinned shortcut. For now, we'll use the getNativeData function just to return the data we received.
Also, we will create a NativeBridge class in the home.dart file to transfer the data to the Kotlin file. In the onLongPress method call, don't forget to call the getNativeData method to send string data to Android by writing NativeBridge.getNativeData('Another Screen'). Here, "Another Screen" string will act as our identifer.
This causes the console to display a print log statement that reads, "From Native: Another Screen." This indicates that, up until now, everything has been going well.
Click here to get the complete source code up to this point.
Step 2.5: Adding some additional files
There are some other things that you might want to do if something doesn't work. The first is adding dependencies to app/build.gradle.
Another thing you should do is add a png file to the drawable folder in the android/app/src/main/res/ folder so that it can be used as the shortcut's icon. I've used this file.
Step 3 & 4: Create a pinned shortcut
We'll be creating Shortcuts.kt, and changing MainActivity.kt a little bit to create pinned shortcuts.
In Shortcuts.kt, we're doing two things. First is creating an actual shortcut item by passing a shortcut name to setShortLabel, a short description to setLongLabel, and an icon to setIcon, these will be sent to ShortcutInfo.Builder. We'll use the icon image we've put in the drawable/ folder.
The second thing is sending the identifier string back to MainActivity.kt using intent.putExtra, which will be later used to send a callback to Flutter.
After this, we will change the MainActivity.kt to call the setUp function in the Shortcuts.kt. Here, I've changed the method name from getNativeData to sendNativeData and created another getNativeData to reflect a better naming convention from the Flutter perspective.
sendNativeData gets the data that is sent from Flutter and uses it to create pinned shortcuts by first calling the Shortcuts.setUp function and then calling the shortcutPin function for the shortcutManager initialization. getNativeData basically sends the callback to Flutter with the identifier screenNames.
Here I've created screenNames as a mutable list, but you can also create it as a string because, at the end, we're fetching the callback data with the help of screenNames[0].
Because FlutterActivity runs before onCreate, it should also be noted that intent.extras is called in FlutterActivity and not in onCreate. The original data that is associated with that specific pinned shortcut is stored in the intent.extras variable before being saved in the screenNames variable.
Step 5: Inflate another screen
To accommodate two functions, we will now modify the home.dart file. sendNativeData, which will only send string data, and getNativeData, which will receive the callback from Android and have the screen launch code.
Note that onLongPress has been changed to NativeBridge.sendNativeData('Another Screen'), and we'll need to call the NativeBridge.getNativeData(context); function just before the return Scaffold statement to get the callback and do the necessary actions.
Now, if you long press on the button in the app, it will prompt you to create a pinned shortcut with the name "Another Screen" and it'll be placed on the mobile home screen. After you terminate the app, clicking on that shortcut from the home screen will take you to the AnotherScreen.

You now know how to create pinned shortcuts in Flutter. If you require the full source code of the project, you can click here. It also contains an additional feature, which is to send a dynamic image for the shortcut icon from Flutter.
Thank you
Did you reach the bottom? Thank you for reading!
Feel free to connect with me. 👋